Getting to grips with Eclipse: remote access and debugging
Most people working with embedded Linux are using Eclipse as the IDE, but not always taking full advantage of it. In this article I will look at one handy plug-in: the Remote System Explorer or RSE. RSE gives you three things: it allows you to explore the files on the target board, meaning that you can copy files over using drag and drop and, the killer app for me, you can edit a file on the target just by double clicking on it. The second feature is a remote shell so that you can run a terminal window in Eclipse - a marginal benefit in my opinion. Finally, and this is really neat, RSE links into the C/C++ Development Toolkit (CDT) so that you can run and debug applications on the target without having to copy them there yourself, and, in the case of debug, without having to start gdbserver. Now, I'm not a lazy person, but it is surprising how much of a benefit that is.
Proprietary development tool kits based on Eclipse have had these features for years. Here, I am going to explain how to do the same using purely open source tools. I used Ubuntu 8.10 on my development PC with an ARM926EJ-S based development board from Digi as the target ( http://www.digi.com/products/embeddedsolutions/devkits/) and Poky Linux cross tools (http://www.pokylinux.org/) but this should work with any recent Linux distribution, target and cross tools
Install Eclipse
All this is based on Eclipse Ganymede, so if you don't have it already, install it together with Sun's JVM like so:
Download Eclipse IDE for C/C++ Developers from http://www.eclipse.org/downloads/packages/release/ganymede/sr1. Note: RSE is broken in SR2: use SR1 or earlier. Extract the tar file into, for example, your home directory
cd ~

tar xzf eclipse-cpp-ganymede-SR1-linux-gtk.tar.gz
Eclipse requires a Sun JVM so download the Java SE runtime from http://java.sun.com/javase/downloads/index.jsp. In the example I am using the current version, 1.6_12, but any Sun JRE from 1.5 on would work also.
cd ~

sh jre-6u12-linux.bin
Then you need to introduce them to each other. I do that by writing a small shell script wrapper which also gives me the opportunity to set the path for the cross tools:
#!/bin/bash

PATH=/usr/local/poky/eabi-glibc/arm/bin:$PATH

$HOME/eclipse/eclipse -vm $HOME/jre1.6.0_12/bin/java -vmargs -Xmx512M
The -vm option points Eclipse at the JVM and -vmargs increases the amount of virtual memory from the default 256MB to 512MB, which is only really necessary if you are working with large projects such as the Linux kernel tree. I save the script as run-eclipse.sh
Install Remote System Explorer
By far the simplest thing is to use the software update feature of Eclipse. In Eclipse, select the Help menu and then Software Updates... Select the Available Software tab and select the RSE components you want like this:

Note that I have de-selected the IP-XACT and NAB components because they have no bearing on what I am trying to achieve here.
It is also possible to download the individual components and install them one by one, but getting the complete list and getting the correct versions is not easy. Contact me if you want more details.
Connections
RSE needs to know how to connect to your target. There are four options:
* DataStore
* SSH
* FTP
* Telnet
For each you need to set up the corresponding server on the target. So, which to choose? First, we can eliminate DataStore because it requires Perl and a JVM on the target. SSH gives you terminal and file access (via sftp). FTP gives you file access alone and Telnet gives you terminals. SSH is the most developed and is the best choice in most cases, so that is what I am going to describe here.
Setting up SSH and SFTP on the target
Either openSSH or Dropbear will do fine, although if you are using Dropbear you will have to get the sftp binary from openSSH. Dropbear is probably easier overall. I am assuming that you have already cross-compiled the packages.
Install Dropbear and sftp on the target. Typically that means copying these files:
/usr/sbin/dropbearkey
/usr/sbin/dropbearmulti
/usr/sbin/dropbear
/usr/libexec/sftp-server
Generate an RSA key
dropbearkey -t rsa -f /etc/dropbear/dropbear_rsa_host_key
Start dropbear
/usr/sbin/dropbear -r /etc/dropbear/dropbear_rsa_host_key -p 22
The last command should be added to your boot-up scripts.
Configuring the connection in Eclipse
Click on Window->Open Perspective->Other... and select Remote System Explorer.
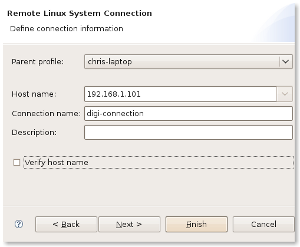
Click on File->New->Other, double-click Remote System Explorer and select Connection. You will see a list of 8 types of system you can connect to: obviously the one you want is Linux. Next give the IP address of the target and a nice name for the connection, like so:
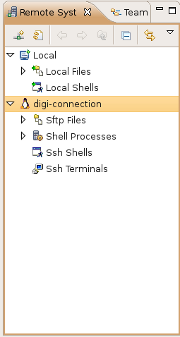
Next you have to say how files are going to be accessed: in this case tick the box marked ssh.files and click Next. Select processes.shell.linux and click Next. Finally, select ssh.shells and then click Finish.
You should now have a navigation pane that looks like this.
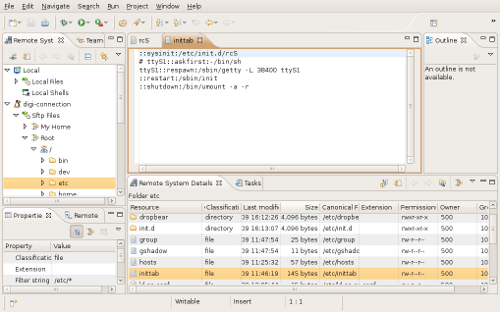
Sftp Files expands to a tree-view of the target file system. The first time you click on it you will be prompted for a user name and password on the target. In a typical test environment such as this, it will be OK to use the root account. Double-clicking on a text file will open it up in an Eclipse editor, which is neat. You can move things around by drag-and-drop, delete things and so on. If you want a list view of the files, you have to right-click the directory and select Show in Table - a bit clunky, but OK once you know how it works.
Shell Processes shows a list of processes on the target somewhat like the ps command. As with Sftp Files, if you want a more detailed view you can right-click Shell Processes and select Show in Table. In both the tree view and the table view you can right-click a process and select kill, but you can only send the default signal (SIGTERM) for some reason.
To open up a “shell”, right-click Ssh Shells and select Launch Shell. That gives you a window with a command prompt with a line underneath where you can enter a command. Not all that useful.
Doing the same thing with Ssh Terminals gives you a proper terminal window.
Here is a screen shot showing the Sftp Files view with the “table view” at the bottom and a couple of files in editor windows.
Remote Debugging
Once you have got this far, the rest is easy. Make sure that you have gdbserver installed on the target then, with everything configured in Eclipse and an application built and ready to debug in the C/C++ perspective, select Run->Debug Configurations and you will see C/C++ Remote Application and C/C++ Remote Application (Experimental - DSF) as a new options. The last depends on the DataStore protocol which we do not have, so select the one above with a double click. That should reveal the application you have built (you may have to click on the New Launch Configuration button), so select it. Now there are three things you need to do
1. On the Main tab where it says Connection, select the RSE connection you created earlier (digi-connection in my case).
2. In Remote Absolute File Path for C/C++ Application, enter the directory you want the program to be copied to and name of the program
3. On the Debugger tab, next to GDB Debugger, give the name of the cross gdb to use, arm-poky-linux-gnueabi-gdb in my case.
Click the Debug button and everything works just as if you were debugging a local application.
Conclusion
RSE is pretty simple to set up and use, once you get past the opaque terminology and useless on-line help. I use it all the time for my development.
Chris Simmonds
March 2009
 Twitter
 GitHub