Android4Beagle

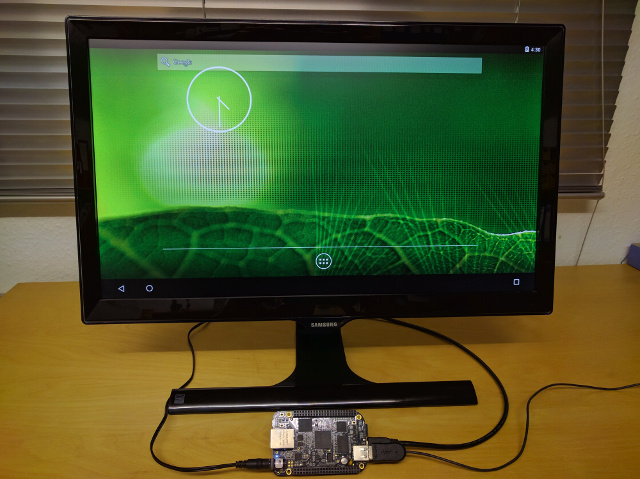
Android4Beagle aims to provide a vanilla AOSP-based Android for Beagleboard.org boards, starting with the BeagleBone Black. Hopefully I will get round to adding the other colours of BeagleBone later, and maybe even the BeagleBoard-xM and BeagleBoard-X15. All of these make great platforms for Embedded Android which could be used to control your home lighting, a robot, or maybe some kind of test equipment.
The source code for the project is at https://github.com/csimmonds/android4beagle. The README file has details on how to build Android4Beagle from scratch.
If you would like to know more about how this is done, and how you can apply this knowledge to your own products, you might be interested in checking out our training courses: www.2net.co.uk/training.html
Board support matrix
| Board | AOSP | Kernel | Cape manager | SGX | Tag |
|---|---|---|---|---|---|
| BeagleBone Black | 4.4.4 | 3.2 | N | Y | android-4.4.4_r2 |
| 5.1.1 | 3.8 | Y | N | android-5.1.1 | |
| 6.0.1 | 4.1 | Y | N | android-6.0 |
There are pre-built SD card images for all of the above, plus the Android image files ready to be installed in the internal eMMC flash memory Let me go through those options in more detail.
Pre-built SD card images
| Board | AOSP | Image |
|---|---|---|
| BeagleBone Black | 4.4.4 | www.2net.co.uk/downloads/a4b-images/kk4.4/a4b-android-4.4.4_r2-bbb.img.xz |
| 5.1.1 | www.2net.co.uk/downloads/a4b-images/l5.1/a4b-android-5.1.1-bbb.img.xz | |
| 6.0.1 | www.2net.co.uk/downloads/a4b-images/m6.0/a4b-android-6.0-bbb.img.xz |
Having downloaded one of the above, the next step is to write it to a micro SD card. It has to have a capacity of more than 4 GiB, and ideally it should be class 10 or higher. Try to avoid cheap or unbranded cards - I have had a lot of problems which have boiled down to using poor quality SD and microSD cards.
Writing an SD card from Linux
Insert a blank micro SD card into your card reader. Open a terminal window and use the lsblk command
to identify which device node it has been assigned. In the example below, I am logged on as user chris and the uSD card
is a nominal 8 GB part plugged into an external (USB) card reader:
$ lsblk
NAME   MAJ:MIN RM   SIZE RO TYPE MOUNTPOINT
sda      8:0    0   477G  0 disk
├─sda1   8:1    0   500M  0 part /boot/efi
├─sda2   8:4    0 457.6G  0 part /
└─sda5   8:5    0  15.8G  0 part [SWAP]
sdc      8:16   1   7.2G  0 disk
└─sdc1   8:17   1   7.2G  0 part /media/chris/2537-B714
In this case, the SD card is /dev/sdc and it has one partition, /dev/sdc1
Unmount all partitions on the SD card:
$ sudo umount /media/chris/2537-B714
Make absolutely sure that you have the right device node before performing the next command because hard drives also show up as /dev/sd*. Writing this image to your hard drive will make your computer unbootable!
Copy the image file to the SD card (which in this example is /dev/sdc, NOT /dev/sdc1):
$ sudo sh -c "xzcat [image file] | dd of=/dev/sdc bs=1M"
Writing an SD card from Windows
For this you will need an image decompression program that can uncompress the xz format.
7zip is a popular choice.
You will also need Image Writer for Windows to write the image to the SD card.
Once both are are installed, it is simply a question of un-compressing the image file and writing it to the SD card using Image Writer
Booting the BeagleBone Black
 |
With the BeagleBone Black powered off, insert the micro SD card.
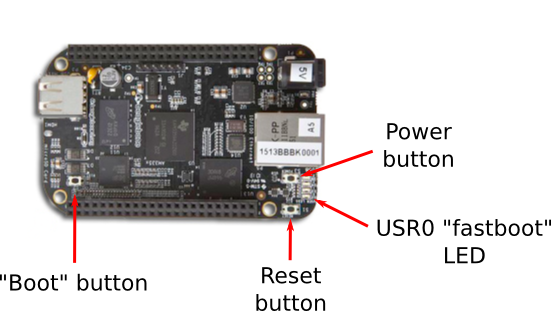
Press and hold the 'boot button' then power up the board by plugging in the mini USB cable. The first boot takes a while - up to three minutes. Subsequently it will boot in about one minute. If it hasn't booted Android after 5 minutes there is something wrong. Try pressing the reset button and trying again. Still not working? Try a different micro SD card. |
Writing the Android images to eMMC
This is a two-stage process. First you write an SD card with a version of U-Boot that supports fastboot and then you use fastboot to write the images to eMMC.
| Board | AOSP | Images |
|---|---|---|
| BeagleBone Black | 4.4.4 | boot.img system.img userdata.img cache.img |
| 5.1.1 | boot.img system.img userdata.img cache.img | |
| 6.0.1 | boot.img system.img userdata.img cache.img |
Begin by downloading boot.img, system.img, userdata.img and cache.img for the AOSP version of your choice.
Then, get the U-Boot images: MLO and u-boot.img
Next, get the SD card image www.2net.co.uk/downloads/a4b-images/a4b-fastboot-sdcard-bbb.img.xz. Write it to a micro SD card, using the same procedure as above.
With the BeagleBone Black powered off, insert the micro SD card.
Press and hold the 'boot button' then power up the board by plugging in the mini USB cable. You should see the USR 0 LED come on, and if you have a serial console attached you will see:
[...]
reading uEnv.txt
17 bytes read in 3 ms (4.9 KiB/s)
Loaded environment from uEnv.txt
Importing environment from mmc ...
Running uenvcmd ...
mmc_send_cmd : timeout: No status update
mmc1(part 0) is current device
mmc_send_cmd : timeout: No status update
Loading efi partition table:
efi partition table not found
Fastboot entered...
musb-hdrc: peripheral reset irq lost!
The board is in "fastboot mode" and ready to receive the images.
Now, use the fastboot command from the Android SDK or an AOSP build, and use it to format the eMMC and install U-Boot:
fastboot oem format
fastboot flash spl MLO
fastboot flash bootloader u-boot.img
fastboot reboot
Wait for the board to restart and for USR0 LED to come on again. Then continue writing the Android images as follows:
fastboot flash cache.img
fastboot flash userdata.img
fastboot flash system.img
fastboot flash boot.img
fastboot reboot
It will boot into Android.
Display options
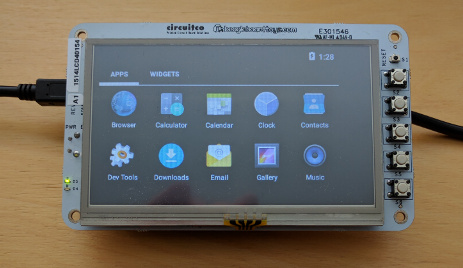
First a note about display blanking. On the Lollipop and Marshmallow builds the display blanks after 10 minutes. You can wake it by pressing the power button on the board (see photo of the BeagleBone Black above for location) or any of the large buttons on LCD cape. I am working on this problem.
HDMI
The BeagleBone Black supports HDMI display resolutions up to 1080p. You can force a particular HDMI mode by appending a string like this the the kernel command line:
video=HDMI-A-1:1280x720@60
For a list of modes, see http://elinux.org/Beagleboard:BeagleBoneBlack_HDMI
LCD cape
|
I use the CircuitCo LCD4 cape, which fits neatly onto the BeagleBoard headers to make a nice unit for a simple UI, to control a robot for example. The main issue is that the resistive touchscreen is not ideal for Android. It works better if you use a stylus rather than a finger.
Unfortunately, this particular cape is no longer available, but there are alternatives. If you find one that works, please share your experiences in the comments section below. |

|
What works, what doesn't?
Android4Beagle is a work in progress. The KitKat build is the most functional because it has the SGX drivers and so has OpenGLE ES 2 and accelerated graphics. However, in all builds the following are working
- HDMI display
- USB keyboard
- USB mouse
- LCD cape display, backlight and touchscreen
- Ethernet, configured via DHCP
- ADB over USB
Other peripherals (e.g. HDMI audio, USB WiFi adaptors) are untested. Any help in adding device configuration for any of these will be gratefully accepted. Note that a plain "it does not work" is not helpful. On the other hand, an analysis of the problem and a proposed solution IS helpful.
Thanks,
Chris Simmonds.

 Twitter
 GitHub