Updated images for Android KitKat on BeagleBone Black
Update: This page is out of date. I have put together all of the information on running Android on BeagelBone on the Android4Beagle page
I have updated the internal eMMC flash and sdcard images for BeagleBone Black. Most changes are to make U-Boot work better with fastboot, especially to make it possible to enter fastboot without having to type "fastboot" at a U-Boot prompt and so avoid the need to have a serial cable. Also, I have increased the sizes of the system and userdata partitions so that you can install more apps. I am still using Android KitKat 4.4.4 and TI Linux 3.2 kernel with SGX accelerated graphics libraries.
Improvements to eMMc
- Added sparse image format to U-Boot, see http://2net.co.uk/tutorial/android-sparse-image-format for a detailed description
- Made U-Boot default to fastboot if autoboot fails
- Turn on user LED 0 when in fastboot mode
- Added code to Linux to make "adb reboot bootloader" work
- Increased system partition from 256 MiB to 512 MiB
- Increased userdata partition from 256 MiB to 1047 MiB
Improvements for SD card
- Increased system partition from 256 MiB to 512 MiB
- Increased userdata partition from 256 MiB to 2560 MiB
Installing Android on internal eMMC flash
You will need
- A BeagelBone Black rev A/B/C
- A micro SD card of any capacity since you are only going to use the first 70 MiB to write a small flasher image
- The mini USB to USB A cable supplied with the BeagleBone
- A 5V power supply because the current used when writing to the eMMC chip may exceed that supplied by a typical USB port. See this page for examples: http://elinux.org/Beagleboard:BeagleBone_Black_Accessories.
|
1. Get http://2net.co.uk/downloads/bbb-android/BBB-aosp-4.4.4_r1-emmc-2014-09-12.zip and unzip it (If you want to build from scratch, follow the instructions in README.md at https://github.com/csimmonds/bbb-android-device-files/tree/kk4.4-fastboot) |
2. Plug the microSD card into your card reader: it will show up as something like /dev/mmcblk0 or /dev/sdc. Make absolutely sure that you know which it is before continuing because hard drives also show up as /dev/sd* and writing this image to your hard drive will make your computer unbootable!. Unmount all partitions that have been automounted on the card. Next, assuming that the card reader is mmcblk0, write the image using a command like this:
|
| 3. With no power on the BeagleBone, insert the microSD card |
4. 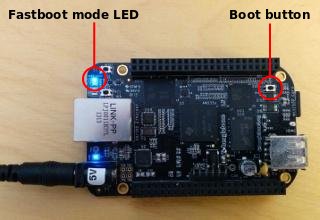 Press and hold the 'Boot button' on the BeagleBone, power up the board using the external 5V power connector and release the button after the fastboot LED lights up Press and hold the 'Boot button' on the BeagleBone, power up the board using the external 5V power connector and release the button after the fastboot LED lights up
|
5. Plug in the USB cable between the mini USB port on the BeagleBone and the PC. Then, using the fastboot command from the Android SDK or an AOSP build, check that the BeagleBone has been detected by typing (on the PC)
|
6. If instead you see
Add this line to /etc/udev/rules.d/51-android.rules
Then unplug the mini USB cable and plug it back in again. Check that the permissions problem has gone away. |
7. Use fastboot to format the eMMC chip and then flash the images
|
| 8. Power off the board and remove the SD card |
| 9. Power on again. Your BeagleBone will boot into Android! |
Installing Android on sdcard
You will need
- A BeagelBone Black rev A/B/C
- A micro SD card of at least 4 GiB
- The mini USB to USB A cable supplied with the BeagleBone
|
1. Get the pre-built image from http://2net.co.uk/downloads/bbb-android/BBB-aosp-4.4.4_r1-sd-img-2014-09-12.zip (If you want to build from scratch, follow the instructions in README.md at https://github.com/csimmonds/bbb-android-device-files/tree/kk4.4-sdcard) |
2. Plug the SD card into your card reader: it will show up as something like /dev/mmcblk0 or /dev/sdc. Make absolutely sure that you know which it is before continuing because hard drives also show up as /dev/sd* and writing this image to your hard drive will make your computer unbootable!. Assuming that the card reader is mmcblk0, write the image using a command like this:
|
| 3. With no power on the BeagleBone, insert the microSD card |
| 4. Press and hold the 'Boot button' while powering up by plugging in the mini USB cable. After a minute or so it should boot into Android |
 Twitter
 GitHub